
Drills Collection
Overview
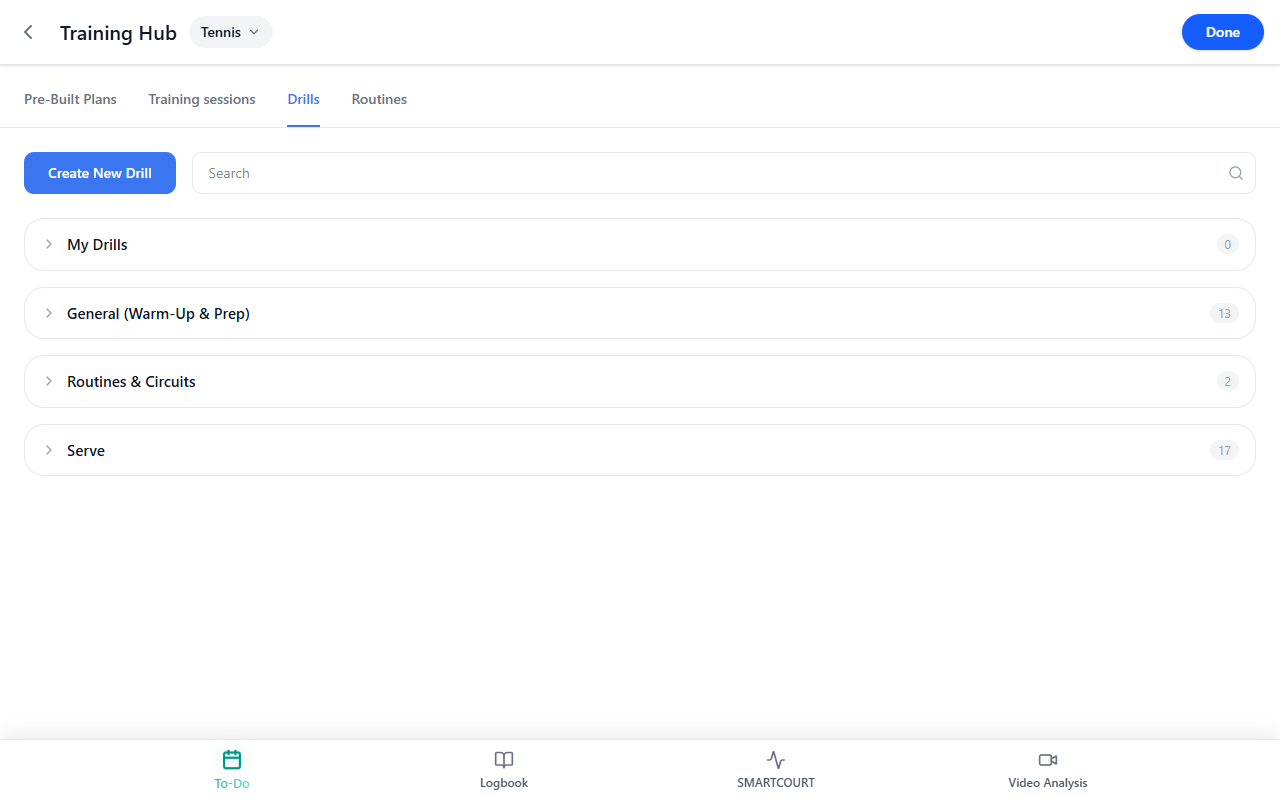
Drills Collection is the drill library inside Training Hub. It helps athletes and coaches choose the right training exercises based on what they want to improve, then use those drills to build more focused sessions and better weekly plans.
A good training process usually starts with a simple question: what do you want to train right now?
It may be rhythm, movement, forehand timing, serve feel, volley control, or a more specific part of the game. Once that goal is clear, Drills Collection helps you find the right exercise for it.
CoachEye already includes a ready-made library of drills, so users can start from proven training content instead of building everything from scratch. At the same time, users can create their own drills when they need something more specific or more tailored to their own coaching method. Step-by-step authoring is covered in the Create New Drill user guide.
Why this matters
Training works best when exercises are chosen with purpose.
Instead of filling a session with random activity, a player or coach can decide what needs attention and then choose drills that support that exact goal. This makes the training plan more useful, helps sessions stay focused, and makes it easier to work on the parts of the game that actually need development.
For coaches, Drills Collection is a practical library that saves time and helps organize training around proven patterns instead of rebuilding familiar exercises every time.
For athletes who train on their own, the library brings more structure and more coaching expertise into practice. It helps turn self-training into something more informed and more repeatable, even without building every exercise from scratch.
In this way, the collection is not just a list of drills. It is a tool for filling the training plan with the right work and turning goals into repeatable practice.
Start from the training goal
The best way to use the drills library is to start with the skill or pattern you want to train.
Before choosing a drill, decide:
- what part of the game needs work,
- what type of exercise would help,
- and whether the ready-made library already covers that need.
For example, you might be looking for:
- a warm-up drill,
- a footwork or mobility block,
- a short-court control pattern,
- a serve rhythm exercise,
- a volley touch drill,
- or a progression that moves from simple to more game-like work.
Once that training need is clear, the library becomes much easier to use.
Use the ready-made library or create your own
In many cases, the fastest and most effective option is to choose a drill from the built-in collection.
CoachEye already includes a library of structured drills designed for common training situations. This helps users work with proven exercises right away and makes it easier to build a solid training plan without starting from a blank page.
Create your own drill when:
- the built-in library is close, but not specific enough,
- you want to match your own coaching style,
- you are designing work for a specific athlete,
- or you want to save a custom exercise for repeated use later.
Use the Create New Drill guide for the full wizard (Basics → Structure → Action Flow → Target Zones → Details → Review, optional Combined Drill / Circuit).
This gives users two strong paths:
- use ready-made drills when they already fit the goal,
- create a new drill when the situation calls for something more specific.
What you can do in Drills Collection
In Drills Collection, you can:
- browse drills grouped by category,
- expand a category to see available drill cards,
- use Search when you already know part of the drill name,
- review each drill card before opening it,
- use the + control on a card to add a drill to your current working flow when supported,
- create a new drill from the same tab (see Create New Drill),
- build a more personal library over time through My Drills.
This makes the page useful both for quick drill selection and for building a more customized training system.
How to read drill cards
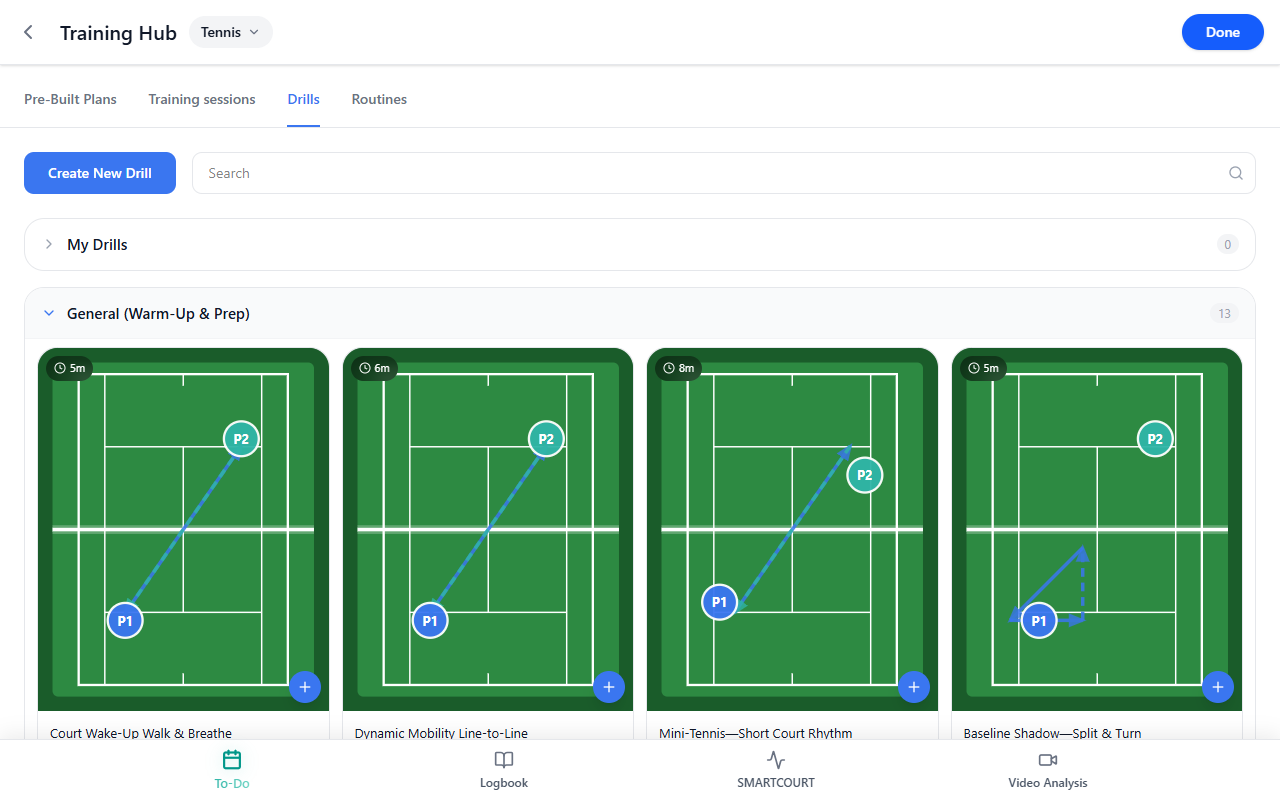
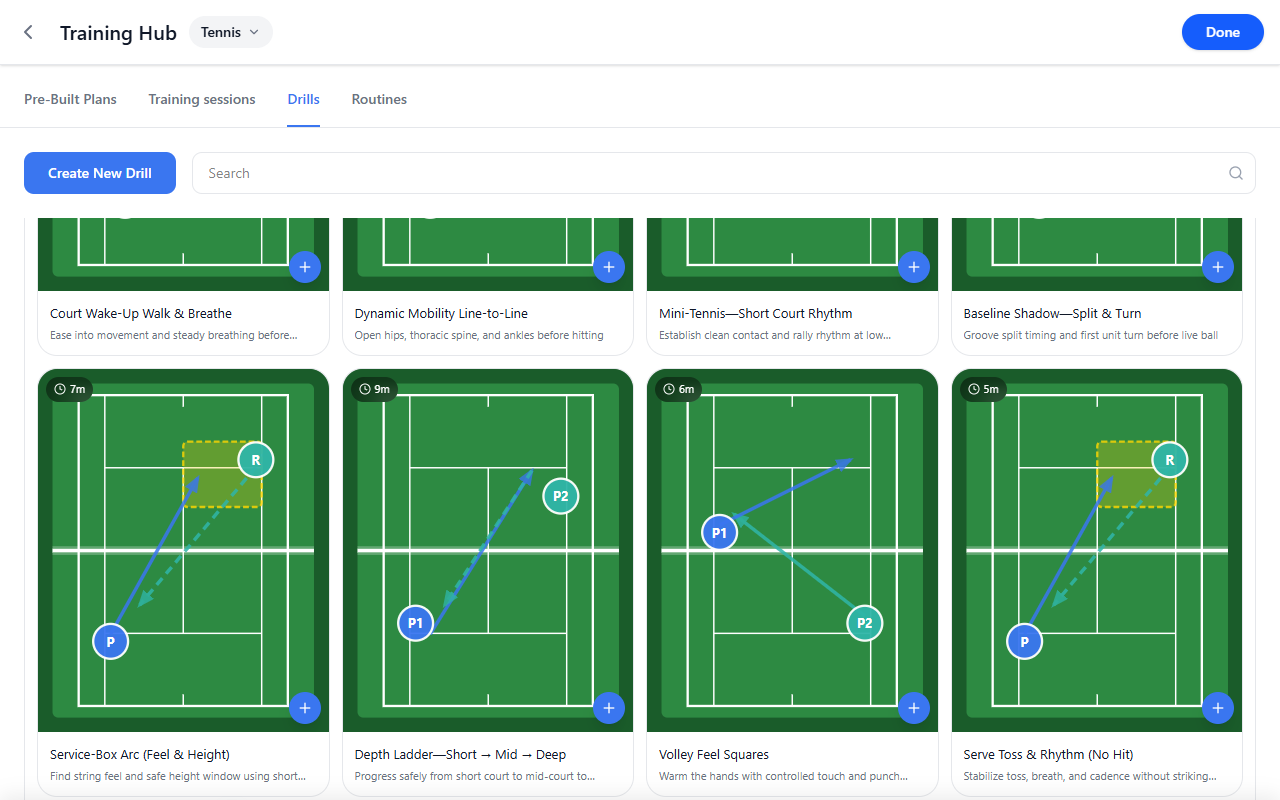
When you expand a category, you see drill cards. Each card follows the same structure.
A drill card includes:
- Court thumbnail — a simplified green court with tactical graphics.
- Duration badge — a dark pill with a clock icon and a time such as 5m, 6m, or 8m, showing the planned length of that drill block.
- Title — the drill name.
- Subtitle — a short line explaining what the drill emphasizes, such as mobility, rhythm, or split step.
- + control — a quick action to add that drill from the library into your working set, depending on the flow supported by your build.
On the court thumbnail, small letters mark roles on court (they are part of reading the drill, not decorative):
- P — one player anchor (often the athlete performing the drill, or the server in a serve-related diagram).
- P1 and P2 — two players when the exercise involves both sides of the court or a two-player rally pattern (who stands where).
- R — receiver: the receiving side or target opposite P in serve or feed setups (partner, target zone, or return side—depending on the drill).
Use the card first as a quick decision tool. Before opening details, you can already judge whether the drill matches your goal, how long it runs, and what kind of work it emphasizes.
What the thumbnails and labels mean
The drill thumbnails are designed to help you quickly “read” the exercise before opening it.
Pay attention to:
- the court diagram, which gives you a simplified view of how the drill is framed spatially,
- the duration pill, which helps you understand whether the drill fits the time you want to spend on that block,
- the title, which identifies the drill clearly,
- the teaser text, which tells you what the drill is mainly training, such as breathing, rhythm, mobility, depth, or touch.
This is especially useful when comparing several drills inside the same category. You can quickly scan the library and choose the block that best fits the element of the game you want to work on.
Court diagram markings
Diagrams reuse the same compact visual language as the Create New Drill editor (court, players, arrows, zones):
| Marking | Meaning |
|---|---|
| P, P1, P2 | Player start or anchor positions on court. |
| R | Receiver / reference target—often opposite P in serve or feed drills. |
| Solid blue arrows | Primary ball path or main movement emphasis. |
| Dashed blue arrows | Secondary feeds, recovery paths, or alternating directions. |
| Yellow dashed boxes | Target zones—where the ball or player should finish or aim. |
| Clock + Nm badge | Planned duration for that drill card (for example 5m, 9m). |
| + on card | Quick action to add the drill from the library into your working set (exact destination depends on product wiring). |
Browse the collection by training need
Once you know the skill or pattern you want to train, browse the category that best matches that need.
For example:
- use a warm-up or prep category when the session needs movement readiness,
- use serve-related drills when the goal is rhythm or toss quality,
- use control or rally-based drills when the goal is contact quality and repeatability.
To keep browsing manageable, expand only the categories you need.
This makes the collection easier to use in real practice planning: instead of scanning everything, you move directly toward the section that supports the training goal.
Search when you already know what you want
Use Search when you already know part of the drill name.
This is the fastest path when:
- you have used a drill before,
- a coach has mentioned a drill by name,
- or you want to return to a familiar exercise without opening categories one by one.
Search is especially useful once your library grows and you want to move quickly from intent to drill selection.
Add a drill to your working flow
Use the + control on a card when you want to add the drill directly from the library into your current working set.
The exact destination can depend on the product flow your build supports, but the purpose is the same: to move from drill discovery into practical use without losing time.
This helps users build sessions more efficiently and makes the collection part of real training workflow, not just a passive reference library.
Create a new drill when needed
If the ready-made collection does not fully match your goal, you can create your own drill from the same area.
From the Drills tab, use Create New Drill to author a custom drill. The drill creation flow includes six steps:
- Basics
- Structure
- Action Flow
- Target Zones
- Details
- Review
Full detail is in Create New Drill.
This is useful when:
- you want to capture a custom exercise,
- you need a drill designed around a specific athlete,
- or you want to preserve your own coaching pattern for future use.
Over time, this helps users build a practical mix of built-in drills and their own authored content.
Build better sessions with drills
Drills are most useful when they help shape real training sessions.
A good session is not just a block of time — it is a sequence of exercises that develops the right skills in the right order. Drills Collection helps users fill that structure with relevant work: warm-up blocks, technical exercises, rhythm drills, movement work, and more applied patterns.
Connect drills to Today for day-to-day execution and Development Plans for weekly structure; see also Add a session from Today when you attach hub content to the calendar.
This is what makes the collection valuable in practice: it helps users turn a training idea into a more complete session, and it makes it easier to work repeatedly on the parts of the game that matter most.
Example drills visible in the collection
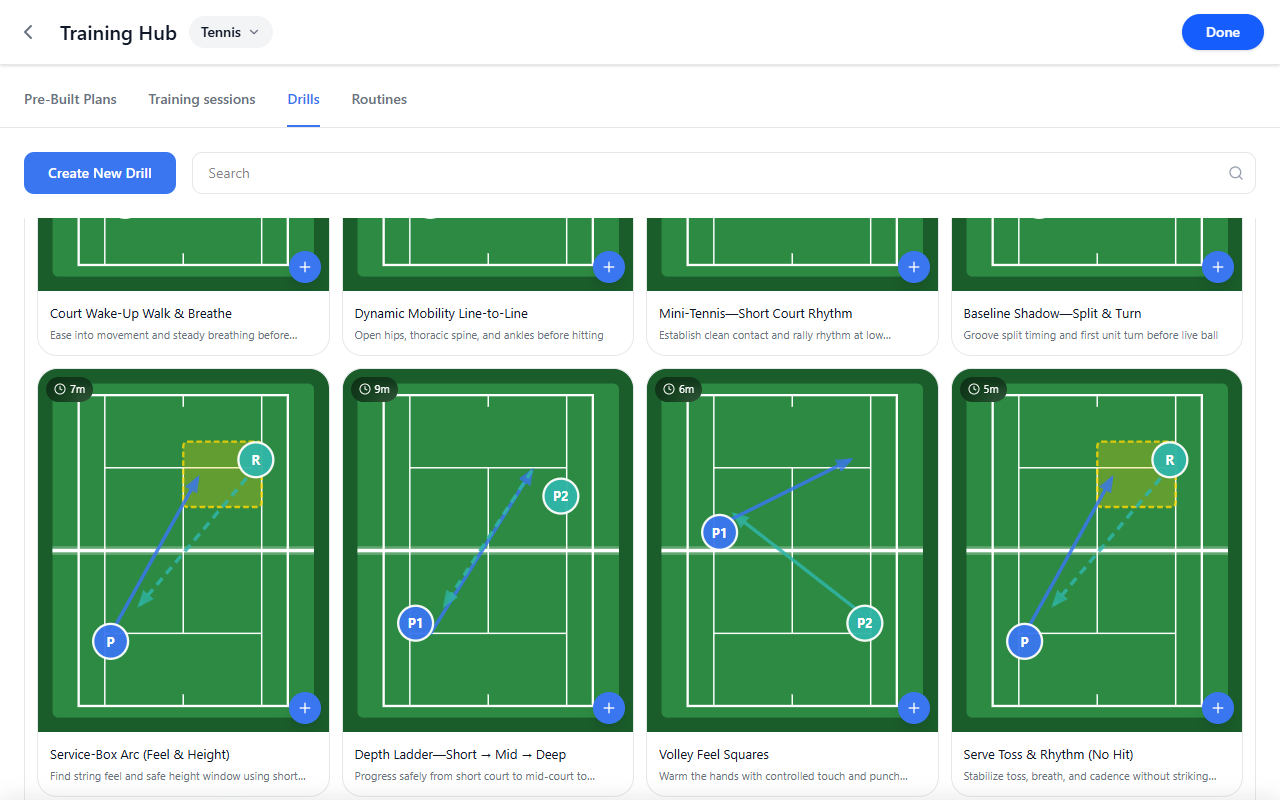
Captured examples include:
- Court Wake-Up Walk & Breathe — ease into movement with steady breathing.
- Dynamic Mobility Line-to-Line — open hips, thoracic spine, ankles.
- Mini-Tennis—Short Court Rhythm — clean contact and rally rhythm.
- Baseline Shadow—Split & Turn — split timing and unit turns.
- Service-Box Arc (Feel & Height) — string feel and safe height window.
- Depth Ladder—Short — Mid — Deep — progress from short court through mid to deep balls.
- Volley Feel Squares — controlled touch and punch volleys.
- Serve Toss & Rhythm (No Hit) — stabilize toss and cadence without striking.
These examples show how the library can support different types of work, from preparation and movement to feel, control, and progression. Your library ordering and exact copy may differ by release.
Tips
- Start from the training goal, not from the first drill you recognize.
- Use Search when you already know part of the drill name.
- Expand only the categories you need to keep the library easier to scan.
- Use the duration pill to judge how well a drill fits into the session you are building.
- Use the + control when you want to move quickly from browsing into action.
- If the built-in library is not specific enough, create a custom drill instead of forcing the wrong ready-made option.
Related guides
- Training Hub — the broader space for drills, routines, and training content.
- Training sessions — bundle drills into reusable session templates (focus, tags, wizard).
- Create New Drill — create a custom drill step by step.
- Today — use drills in day-to-day training workflows.
- Development Plans — place drill-based work into the weekly schedule.
Archived: previous page version
*The section below is the prior draft of this page (kept for reference). It has been superseded by the content above.*
Overview (archived)
On Training Hub, the Drills tab is the drills collection: a browsable library of tennis drills grouped by category. Each drill appears as a card with a court diagram, duration, title, and a short purpose line. Search and category rows help you narrow the list; Create New Drill adds exercises to My Drills.
Why use the drills library (archived)
Athletes and coaches rarely want to reinvent every exercise. A shared drill library lets you grab a structured warm-up, technical block, or serve progression in seconds, save what works, and—when the catalog is not enough—author a drill that fits one player or one phase of training.
What you can do here (archived)
- Open Training Hub → Drills to browse the collection.
- Use Search to narrow drills by name or keyword.
- Expand categories (chevron rows) to reveal drill cards in a grid.
- Read each card’s thumbnail, duration, title, and one-line purpose.
- Tap + on a card when you want to attach that drill into a downstream flow (session / plan—per your app build).
- Tap Create New Drill to define your own drill (wizard described in Create New Drill). New items surface under My Drills when saved.
Page layout (Training Hub · Drills) (archived)
Across the top of Training Hub you get sport context (Tennis selector in the capture), secondary tabs (Pre-Built Plans, Training sessions, Drills, Routines), then the Drills toolbar: primary Create New Drill and Search.
Below that, the collection is organized as accordion sections: each row shows the category name and a count badge on the right (how many drills live in that bucket). Expanded sections show a horizontal row or grid of drill cards.
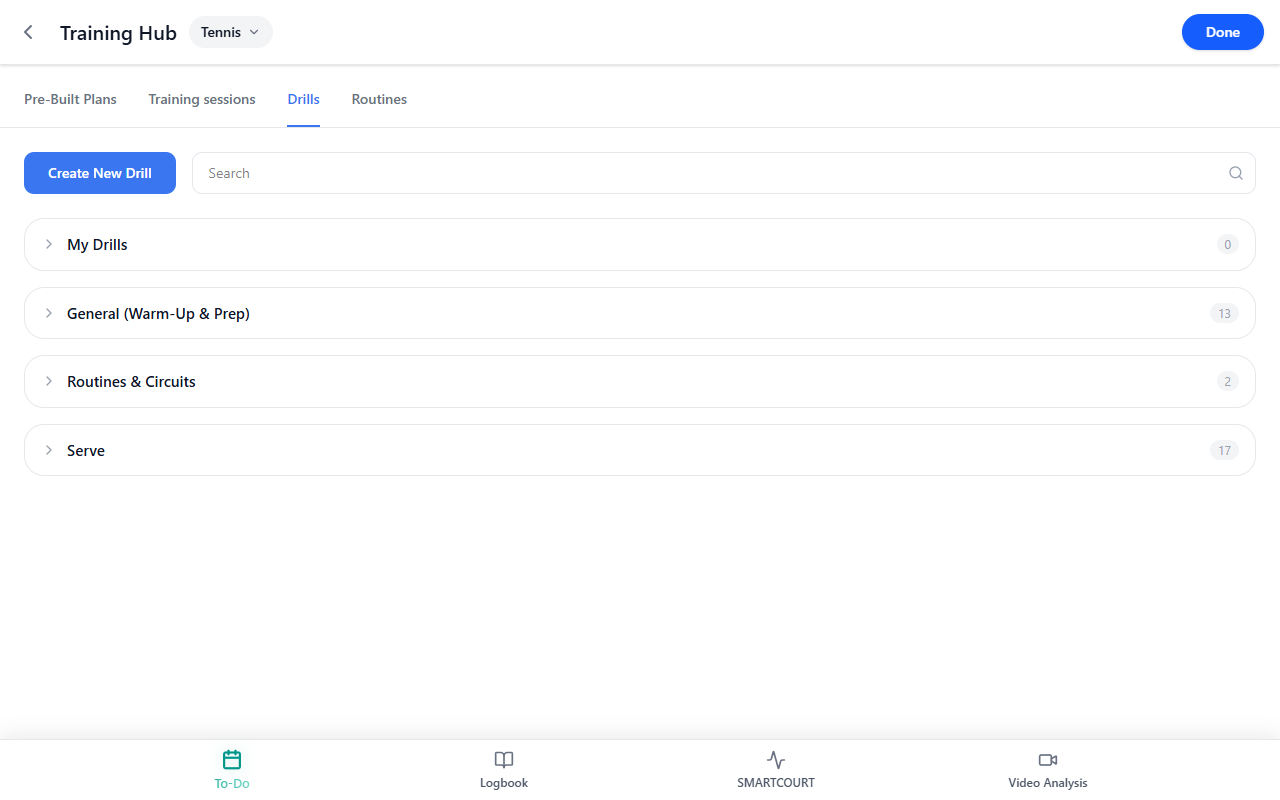
Categories and counts (archived)
In the reference capture, visible top-level buckets include:
| Category | Role (example capture) |
|---|---|
| My Drills | Drills you created via Create New Drill. Starts at 0 until you save something. |
| General (Warm-Up & Prep) | Movement prep, mini-tennis feel, rhythm—typically shorter blocks at the front of practice. |
| Routines & Circuits | Multi-part or circuit-style sequences (in the capture, General listed 13 drills and Routines & Circuits listed 2). |
| Serve | Serve and serve-plus-one style drills (17 in the capture). |
Treat names and counts here as examples from that capture snapshot, not a guarantee for every account or release.
Drill cards in the grid (archived)
When you expand a category (for example General (Warm-Up & Prep)), you see drill cards. Each card is built the same way:
- Court thumbnail — simplified green court with tactical graphics.
- Duration badge — small dark pill with a clock icon and time such as 5m, 6m, 8m (planned length for that block).
- Title — human-readable drill name.
- Subtitle — one line on what the drill emphasizes (mobility, rhythm, split step, etc.).
- + control — circular + on the diagram corner; use it when you want to add that drill to whatever stack your build supports (session composer, routine, saved list—wording varies by flow).
Expanded category with the first row of drills visible:
Scrolling reveals more drills and longer descriptions:
Create-entry affordance (same tab):
How to read the court thumbnails (archived)
Diagrams reuse a compact visual language—similar in spirit to the Create New Drill editor (court, players, arrows, zones):
| Marking | Meaning |
|---|---|
| P, P1, P2 | Player start or anchor positions on court. |
| R | Receiver / reference target—often opposite P in serve or feed drills. |
| Solid blue arrows | Primary ball path or main movement emphasis. |
| Dashed blue arrows | Secondary feeds, recovery paths, or alternating directions. |
| Yellow dashed boxes | Target zones—where the ball or player should finish or aim. |
| Clock + Nm badge | Planned duration for that drill card (for example 5m, 9m). |
| + on card | Quick action to add the drill from the library into your working set (exact destination depends on product wiring). |
Use thumbnails to sanity-check whether a drill matches your goal before you open details or add it to a session.
Example drills visible in the captures (archived)
These appear in the captured grid (names and descriptions taken from the captured UI):
- Court Wake-Up Walk & Breathe — ease into movement with steady breathing (*5m*).
- Dynamic Mobility Line-to-Line — open hips, thoracic spine, ankles (*6m*).
- Mini-Tennis—Short Court Rhythm — clean contact and rally rhythm (*8m*).
- Baseline Shadow—Split & Turn — split timing and unit turns (*5m*).
- Service-Box Arc (Feel & Height) — string feel and safe height window (*7m*).
- Depth Ladder—Short — Mid — Deep — progress from short court through mid to deep balls (*9m*).
- Volley Feel Squares — controlled touch and punch volleys (*6m*).
- Serve Toss & Rhythm (No Hit) — stabilize toss and cadence without striking (*5m*).
Your library ordering and exact copy may differ by release.
Building your own drills (archived)
When catalog content is close but not exact—or you coach a repeating pattern—you can Create New Drill:
- Profile menu → Training Hub → Drills tab → Create New Drill.
- Complete Basics → Structure → Action Flow → Target Zones → Details → Review (optional Combined Drill / Circuit for stacked sequences).
Saved drills accumulate under My Drills, so the collection mixes publisher content with your authored blocks.
How this connects inside CoachEye (archived)
- Training Hub — parent hub (plans, sessions, drills, routines).
- Create New Drill — author drills that appear in My Drills.
- Today / Add a session from Today / Development Plans — pull drills into scheduled work when your build supports those bridges.
- Logbook — review completed sessions that consumed drills.
Tips (archived)
- Start from Search when you already know part of the drill name.
- Expand only the categories you need to keep scrolling manageable.
- Lean on duration badges when stacking multiple drills into one training day.
- If My Drills is empty, create one tailored drill—you will see how authored content sits beside the pre-built library.
Related guides (archived)
- Training Hub — full hub overview beyond the Drills tab.
- Create New Drill — wizard steps and combined circuits.
- Today — daily execution surface for scheduled training.
- Development Plans — weekly placement of drill-based work.