
Smart Court: Start New Session — User Guide
Start New Session on the SMARTCOURT tab opens a new training session at the court you pick and takes you into the full-screen training session workspace. The app may prefill time, sport, and one participant; you add drills and structure as you go. From there you run the clock, manage who is on court, build the plan, review shot or fitness-style metrics, open analytics, and reach cameras and recordings. Coaches and athletes who are on site use this when Smart Court is the right context (venue plus “today”) and they want a blank session without opening Today or a scheduled card first.
Why this matters
Court time is limited. Starting from Smart Court with Start New Session ties the entry to the place you are using, keeps the flow fast, and lands you in the same rich workspace you would use after opening a planned session—so preparation, execution, and later review stay consistent. A blank plan is useful when the day shifts and you need to improvise drills, extra time, or a different focus without hunting through the calendar first.
What you can do here
On Smart Court
- Tap Start New Session on the default court row, or open a specific court row (for example Court 3) and use Start New Session there.
In the training session workspace
- Go back to return to where you were in the app.
- Start or end the timed session; use + Min when you need more planned time.
- Change date or start time from the time badge (opens the scheduling calendar).
- Open Cameras and Recordings from the Location row on larger layouts.
- Open Participants to add or adjust who is in the session.
- Open Training Plan to add drills, quick activities, and items from Training Hub.
- Set Analysis Focus so metrics reflect the group or an individual.
- Open Shot Events for the live shot list when that control is available.
- Switch Serve, Forehand, Backhand, and Fitness to change which metrics you emphasize.
- Expand Show Analytics for session-level charts and summaries.
- Follow the Ready to train? checklist until you tap Start Session.
Some numbers and badges depend on your camera, session, and account setup. Use the screen to confirm the workflow before treating session metrics as coaching evidence.
How to start from Smart Court
Default court
When the pinned default court matches where you are training, Start New Session is the fastest path: open SMARTCOURT, then tap the wide Start New Session control. The subtitle (for example *Create a session at Court 1*) matches the court context you are starting from. The Scheduled Today list on the same screen is separate—it helps you compare what is planned, not what this button creates.
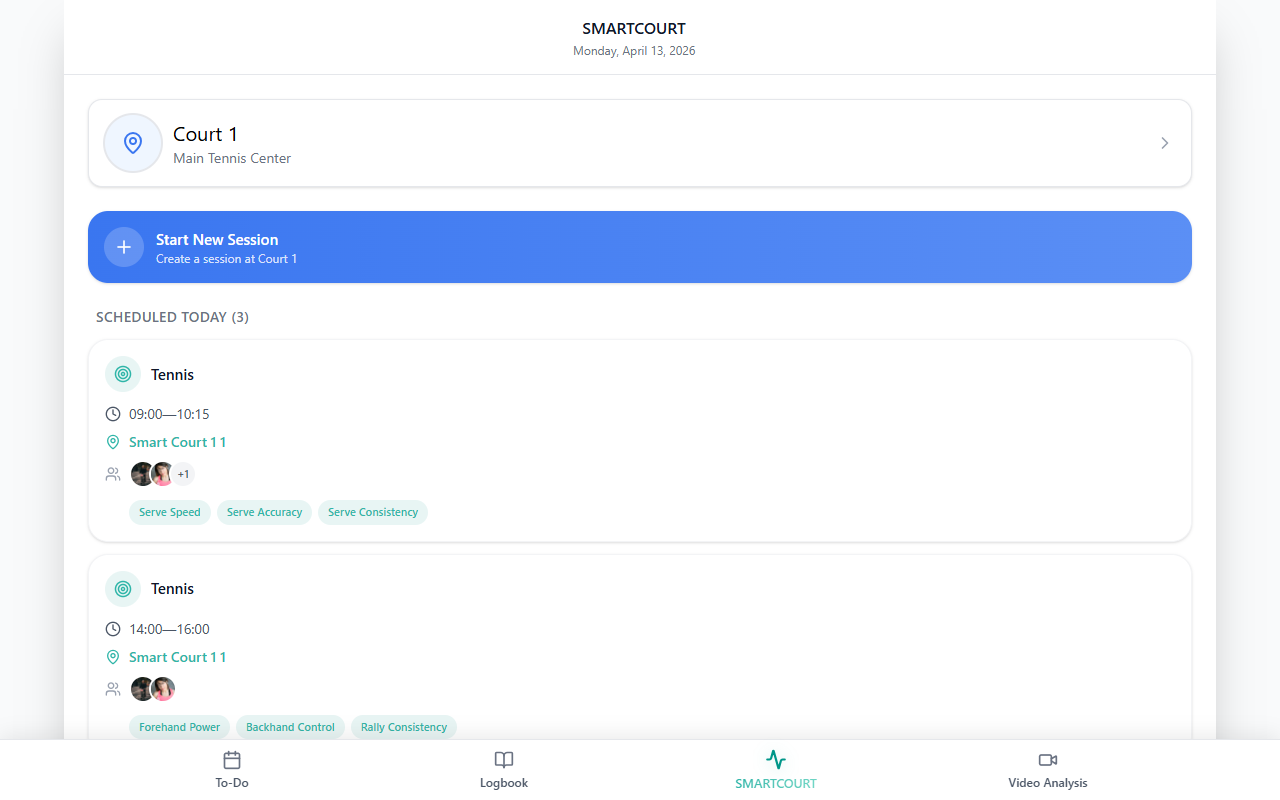
Figure: SMARTCOURT with Court 1 and the Start New Session control.
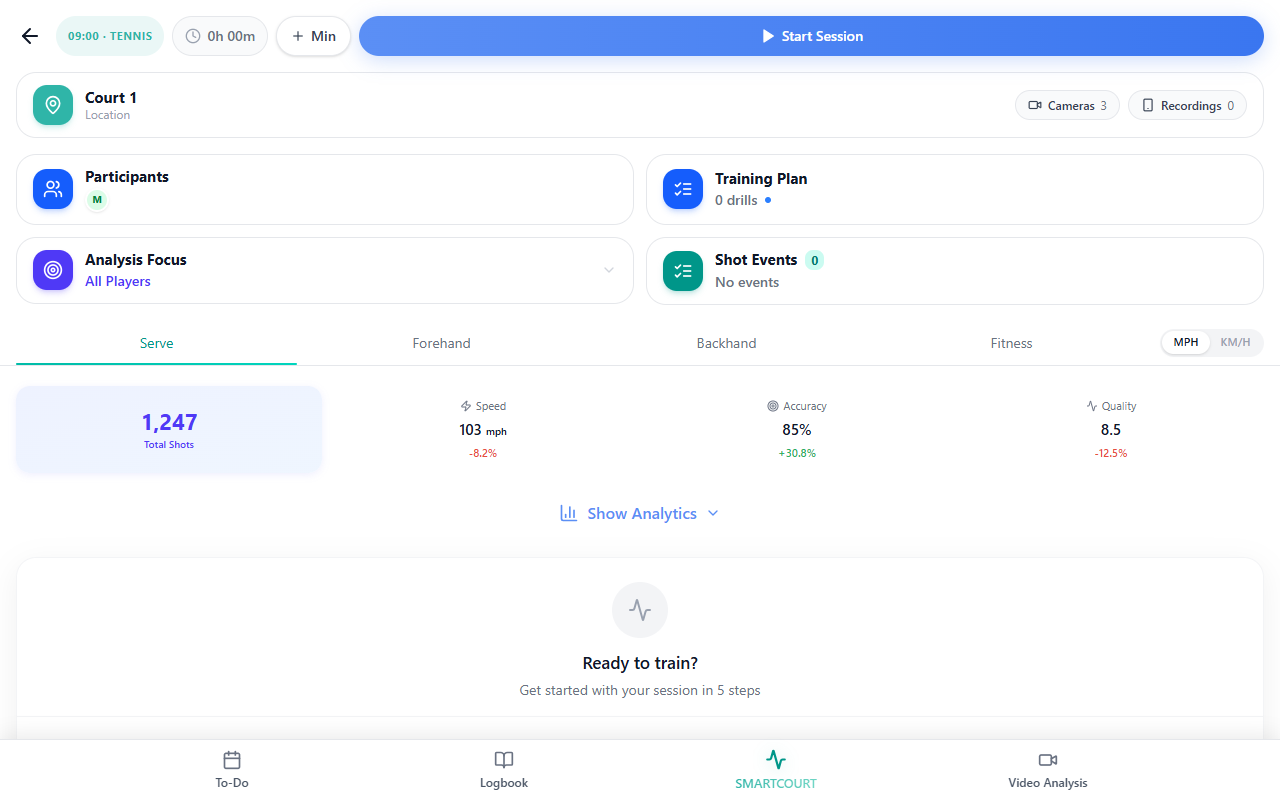
Figure: Session workspace right after starting from Court 1—time, sport, planned duration, Start Session, and Location with Cameras.
Another court row
Expand the court you need (for example Court 3), then tap Start New Session inside that row. The session workspace shows the same layout; the Location label reflects the court you chose.
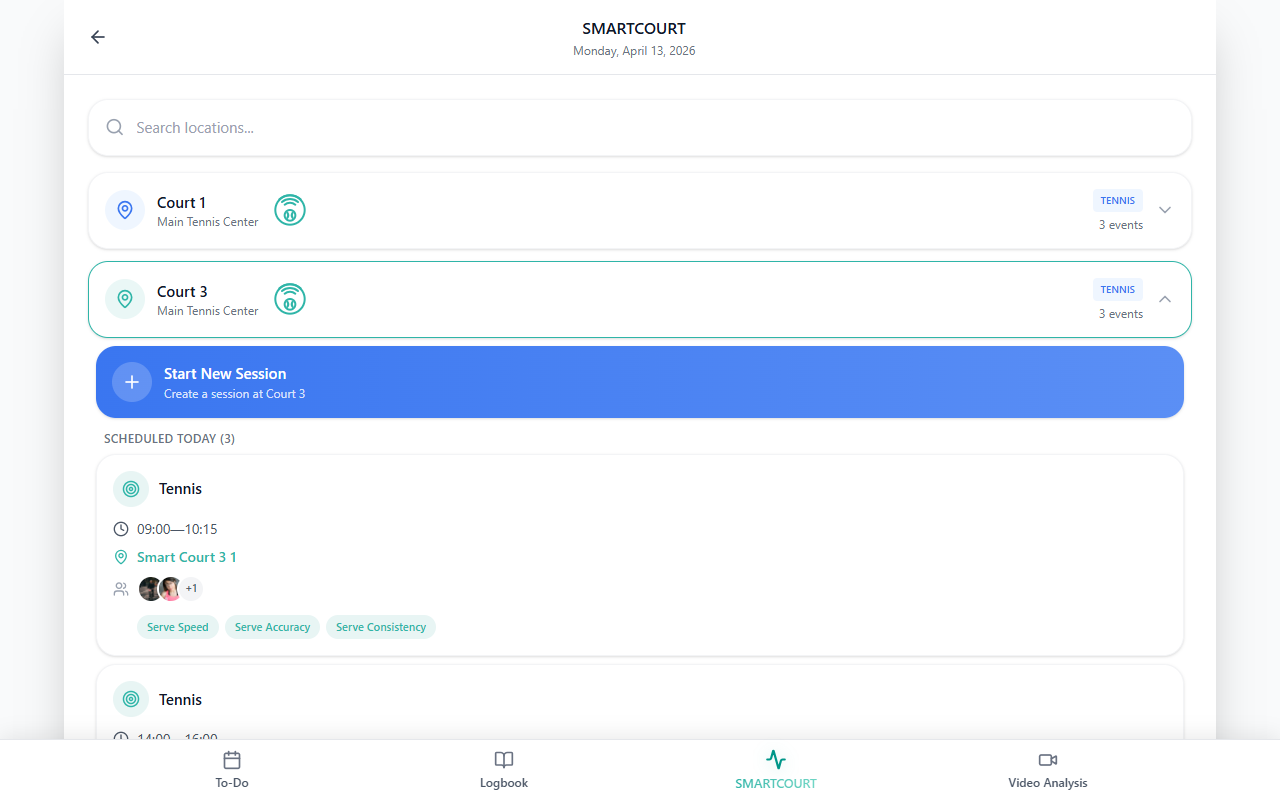
Figure: Court 3 expanded; inner Start New Session for that court.
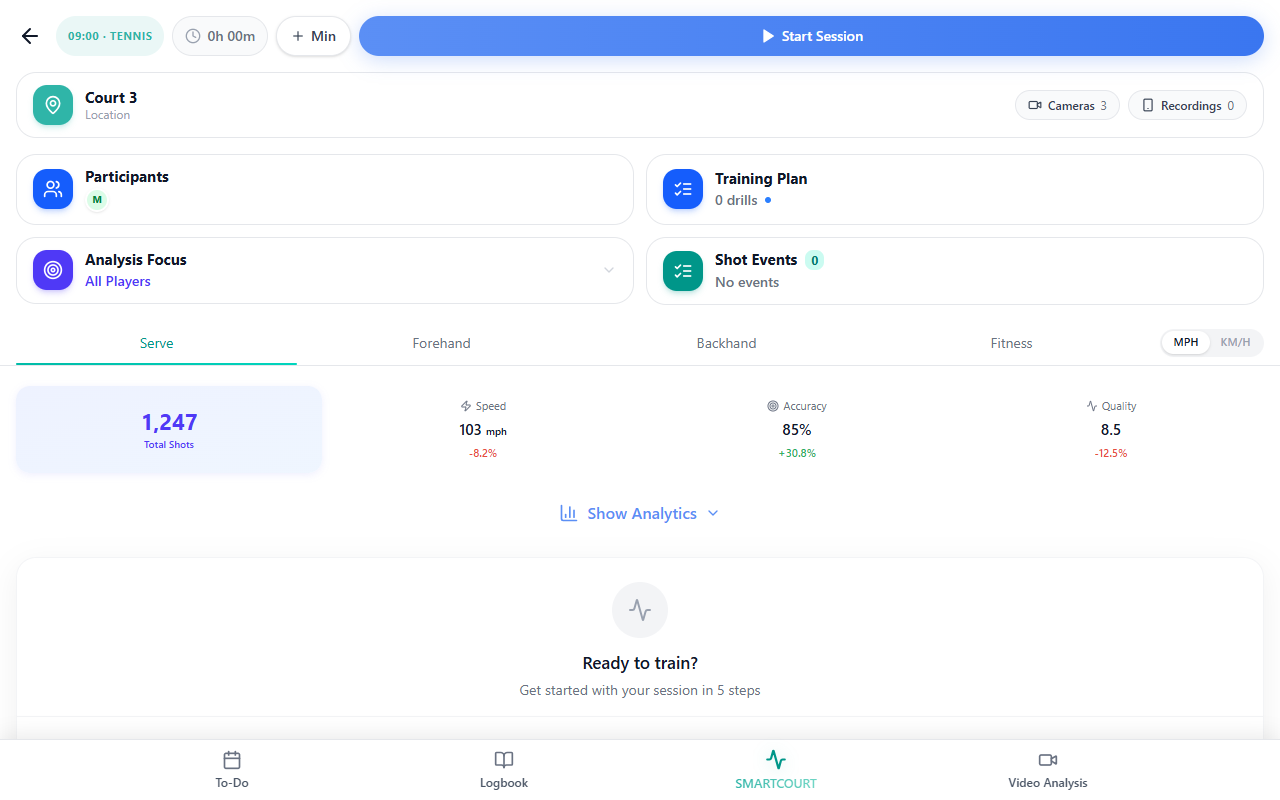
Figure: Session with Location showing Court 3.
On desktop widths you may not see a large Training at … title; context comes from the Location row and the header. On narrow layouts, a larger title may appear—either way, the court name in Location is what to trust.
The session screen at a glance
Top: Back, the time · sport pill, the timer, + Min, and Start Session (or End Session when the clock is running).
Below (desktop): A Location row with Cameras and Recordings.
Center: Four tiles—Participants, Training Plan, Analysis Focus, Shot Events.
Lower: Shot-type tabs, metric columns, Show Analytics, and the Ready to train? checklist until you start.
Header: time, timer, and session controls
- Back returns you to the previous screen and restores your tab context.
- Time · sport opens Schedule so you can move the date or start time on the calendar.
- Timer shows planned duration before you start, then remaining time after Start Session.
- + Min opens Extend Session (for example +15, +30, +1 hour) so the planned block can grow without restarting.
- Start Session begins the timed session; End Session stops it and may take you to a results view depending on your app version.
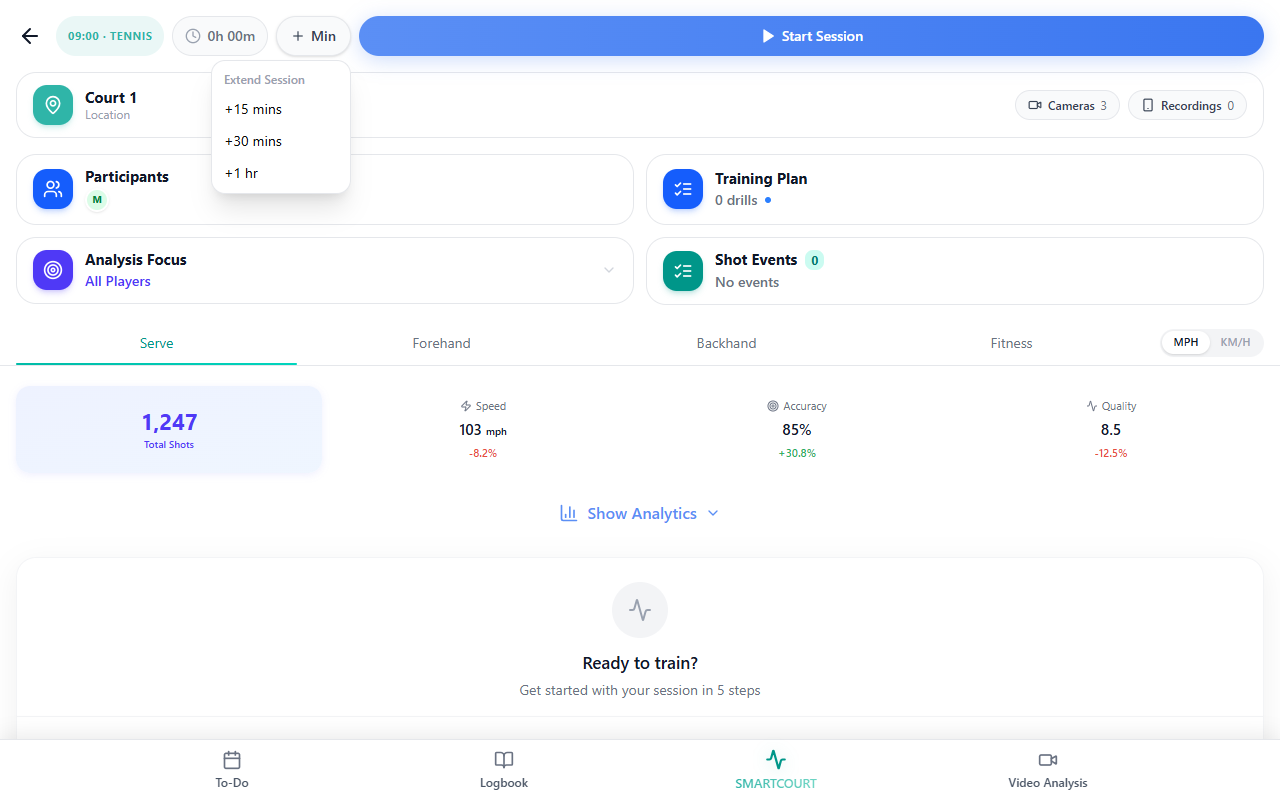
Figure: + Min with Extend Session options.
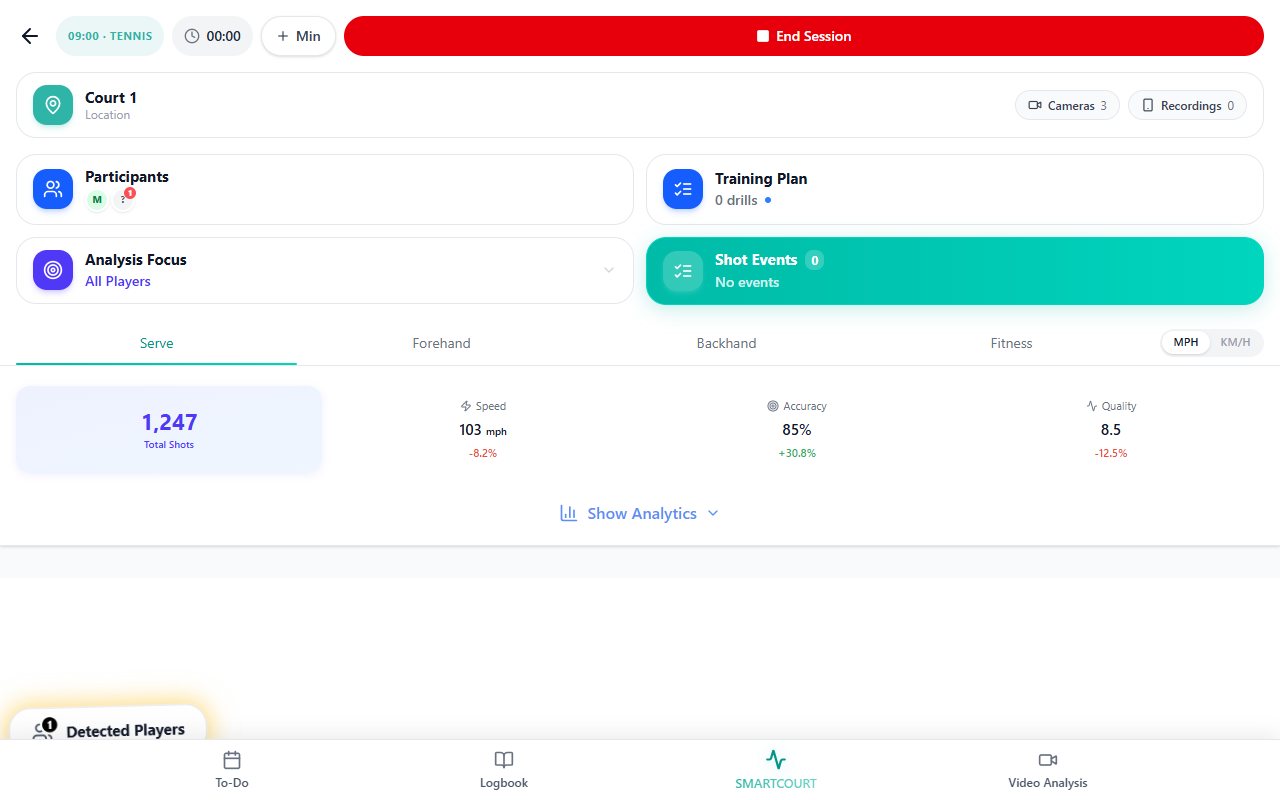
Figure: After start—End Session, countdown, and Shot Events in an active style.
Location, cameras, and recordings
The Location row shows which court you are on and shortcuts to Cameras and Recordings. Use them to open camera sources and your recording list without digging through menus. Counts and connection status depend on the cameras connected to your session.
Main tiles
Participants
Opens a full-screen editor so the session matches who is on court—important for plans and per-player analysis. Tap Done to return.
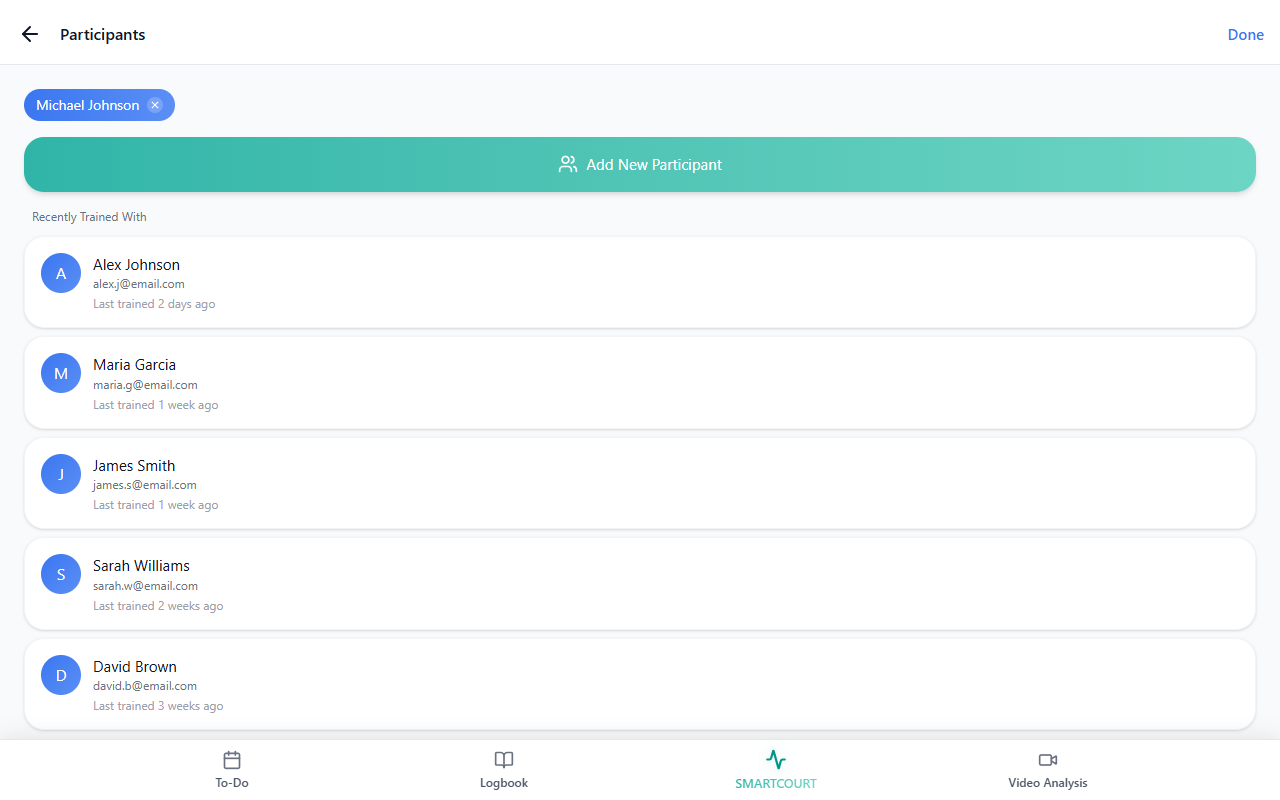
Figure: Participants list and Done.
Training Plan
Start New Session begins with no drills in the plan; here you add structure, quick activities, and catalog items from Training Hub. Use the plan’s back control to close when you are finished.
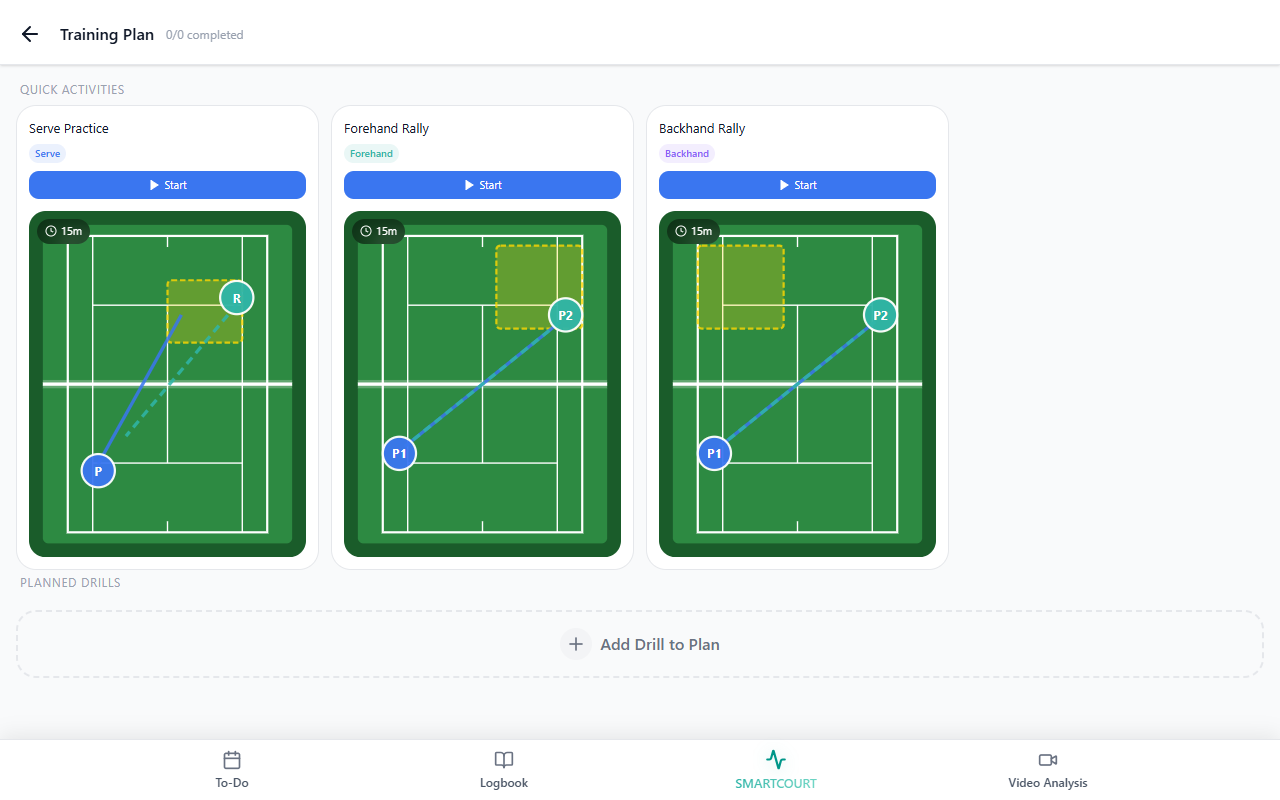
Figure: Training Plan with quick activities and an empty completed count—typical right after Start New Session.
Analysis Focus
Choose all players or a named participant when the session needs player-specific analysis. Your choice affects how aggregate metrics are shown. For cameras and player identity on court, see Smart Court.
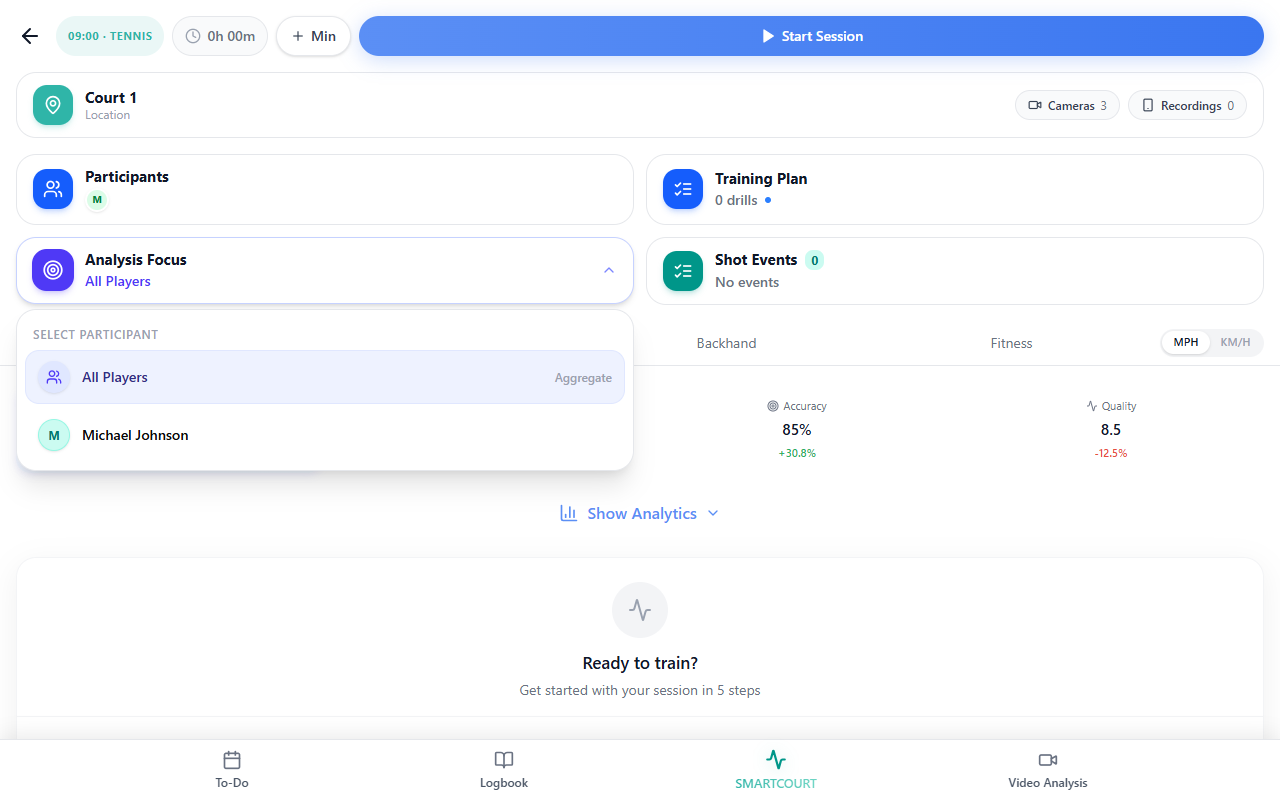
Figure: Analysis Focus / participant picker.
Shot Events
Opens the shot-event overlay: counts and styling update when the session is live. Treat rapid counter changes as illustration, not calibrated match statistics.
Shot tabs and metrics
Serve, Forehand, Backhand, and Fitness switch the metric set (for example total shots or reps, speed, accuracy, quality, or fitness-oriented columns). The same layout supports tennis- and conditioning-style views. Numbers depend on the live feeds and metrics available for the session.
Show Analytics
Tap Show Analytics to expand Session Analytics—shot-type focus, metric tabs, summary values, and a chart area. Use it to see where session review lives in the workflow; chart values depend on the analytics available for the session.
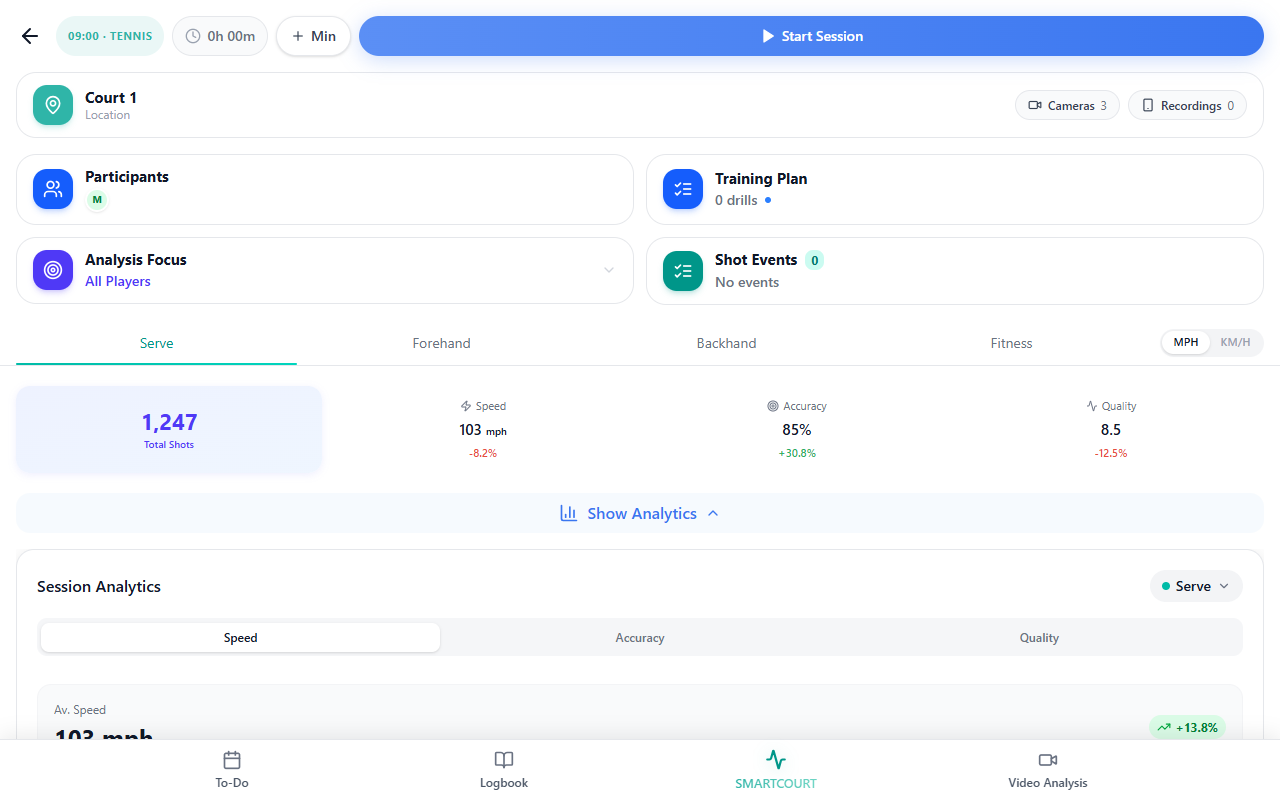
Figure: Session Analytics expanded.
Ready to train?
The Ready to train? card lists five steps—start the session, add participants, set the plan, start a drill, manage recordings—that map to real controls on the screen. Scroll until the card is visible (on desktop it sits below analytics). Step 1 lines up with Start Session in the header; the last step points you to Cameras and Recordings. The card typically hides once the session has started.
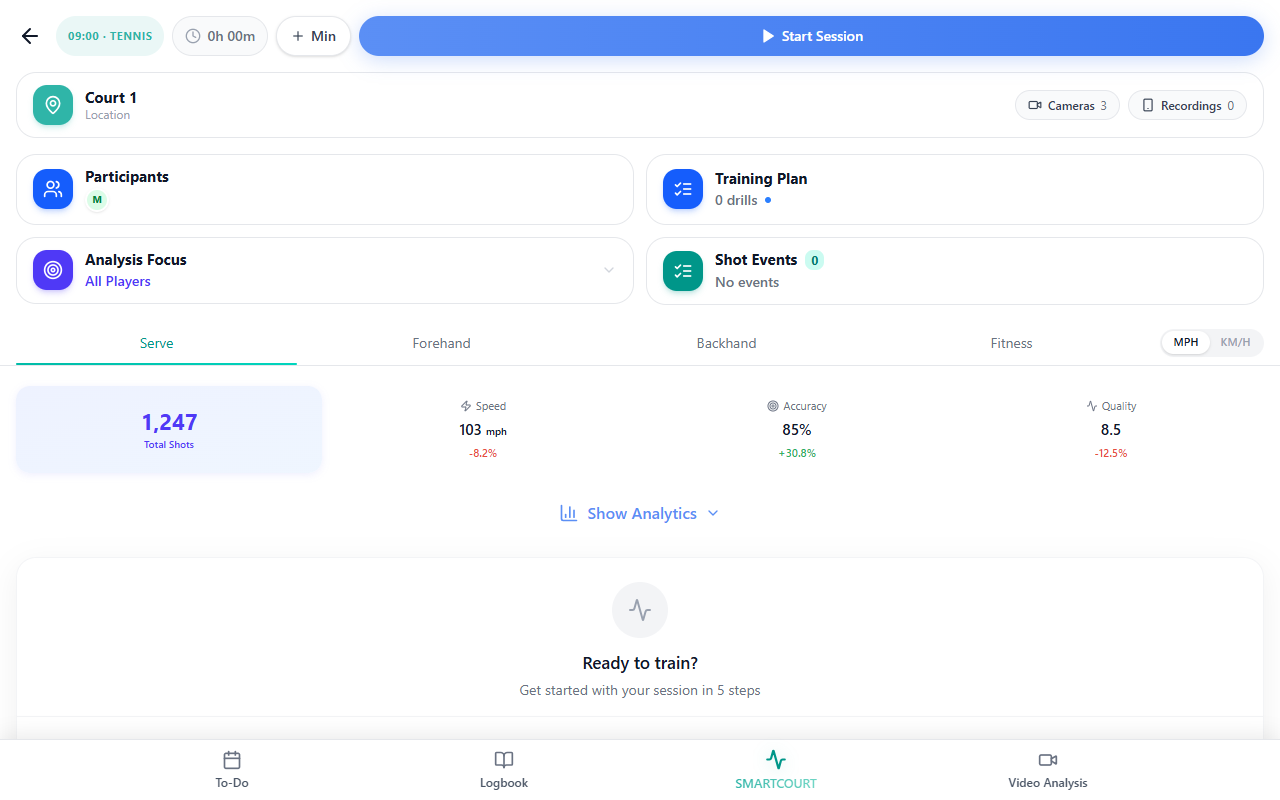
Figure: Ready to train? checklist.
Other surfaces you may open from here
From this workspace you can also reach camera settings, recordings, drill detail, a Training Hub picker when adding drills, session information (including notes) from the header on some layouts, and the calendar from the time badge. Follow the on-screen labels for the options your app version includes.
Tips
- Prefer Start New Session when the court is already the organizing idea; use Add a session from Today when you are planning from the day or calendar first.
- A scheduled card from Today often opens the same session screen with more prefilled plan data; Start New Session starts with less in the plan—build it in Training Plan.
- If you do not see a large Training at … headline, rely on Location and the header.
- End Session may open a results flow; details depend on your app version.
- If two similar buttons appear for the same tile on wide screens, use the control that matches your layout (the app may render mobile and desktop variants).
Related guides
- Smart Court — venue layout, cameras, and court context.
- Today — daily timeline and calendar.
- Add a session from Today — planning a session from the day view.
- Training Hub — drills, routines, and catalog.
- Core concepts — how major ideas fit together.
- Core concepts — terms and definitions.
- Interface overview — how the app is organized.